Thursday, July 31, 2014

Breakfast....cupcakes?

So, I wouldn't consider myself a really awesome cook. BUT I do like to try out new recipes. Hubs always gets mad at me gives me a hard time because I never follow the recipe exactly. But, hey! I’m my own person and I like doing things my own way. Ha!

One thing that’s really hard for me is breakfast. Unfortunately, I have a day job and even more unfortunate is that it is an hour to an hour and half drive from my front door to the parking garage at my office. Blaaaah! So needless to say I’m typically in a pretty big hurry when I am getting ready for my day. I get into these really bad habits of stopping for breakfast (yes, I too have a Starbucks addiction) but I’m trying to come up with easy breakfast ideas that me and Hubs will both like.

This was one we tried this week and it was a pretty big hit! Hashbrown Cupcakes! Easy to make, grab on the go, heat up at the office. Super simple and pretty tasty! There are many different ways you can do this. Personally, I’d prefer to add some onions and peppers into mine but Hubs would wrinkle his nose at that…SO we stick with the basics.

First preheat your oven to 350 F.

Then, all I did was brown 1 pound of sausage (you can use turkey sausage to make it healthier!) and mix that with one bag of frozen hash browns (thawed), a little bit of milk, 5-6 eggs depending on size, 1 and ¼ cup of shredded cheese, and salt and pepper to taste.


You can make this as a casserole but for the purpose of it being a “grab and go” meal, I decided to use muffin pans! This mixture makes about 18-24 cakes depending on how many eggs you use and how full you fill your muffin pan. Be sure to grease your pans first because the hash browns WILL stick.


Then start filling your muffin pans. Quick tip for a not so messy process -  use an ice cream scoop!


Now, place in oven and bake for about 25 minutes. Be sure to check on them every once and a while…you don’t want them too crispy. Once they start to turn golden brown, pull them out of the oven and let them cool in the muffin pan for about 10 minutes. Once cooled, you can use a knife or spoon to get them out. They make such a perfect little cupcakes!


Reheat instructions: 25-35 seconds per cake in the microwave


Hope you enjoy! If you come up with any fun variations, please share in the comments! I’d love to hear about your creations!

Stay safe.


KC

Thursday, July 24, 2014

Bar Stock Couples Shower

Hey y'all!

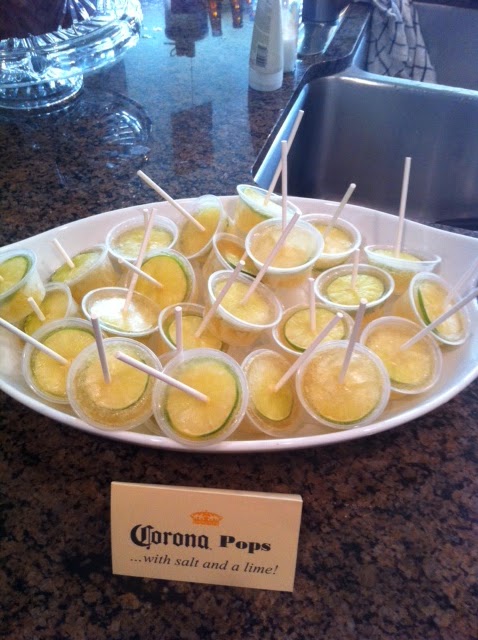
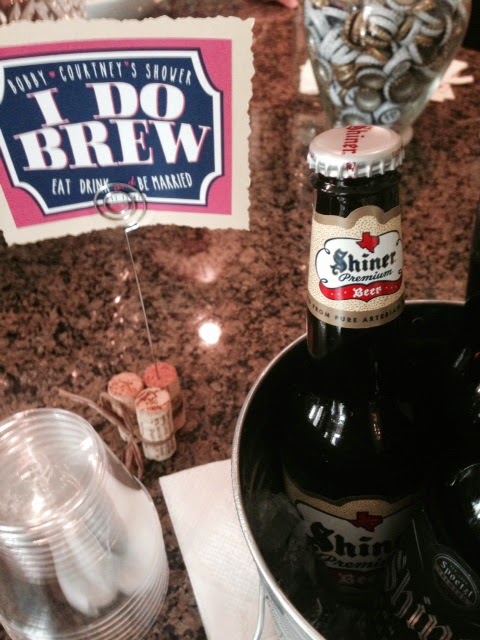
I recently hada bar stock shower for one of my best friends. She's getting married in September (I can't believe how close it is!) here in Texas and we can not wait!

Thought I'd share a few pictures from the shower. I'm not going to go into detail about every thing I did so if you have questions or would like to know "how to" just shoot me an email!

The theme was "Love is Brewing." We had a beer tasting, played a couple quick games like guessing how many bottle caps were in the vase and you win a prize. We also did the Shoe Game for the bride and groom - if you have never played this game, you definitely should! It is always a hit. Then we followed it up with some beer pong, corn hole, and of course Cards Against Humanity.

Enjoy!


If I get more pictures from guest, I will be sure to share! I am usually all over taking pictures for things like this but I was more focused this time on making sure the Bride and Groom had a good time! 

KC

Monday, July 21, 2014

Barn Wood Bench

Ya'll, this might be my favorite thing yet so I'm really excited to share this! 

Good morning and happy Monday! I had mentioned in a previous post (A Vase and a Lamp Shade) that I had a list of things we needed for our bedroom. Well today, I got to cross one off! Here's where we stand:

List of things we need:
Nightstands
Lamps
End of bed bench

So, back in the spring we went to one of my favorite flea markets in Round Top (Like, seriously....it's huge. A junkers haven!) and found this nice man who was selling old barn wood out of the back of his pick up. Hubs and I didn't have a clue what we wanted to do with it but we new we loved the looks of it so we bought over 50 feet for $15 bucks. Crazy! 

This seems to happen a lot, but Hubs and I spent hours shopping for a bench to go at the end of our bed. It was shocking how expensive those suckers were! $200 bucks here, $500 bucks there. What?! No way am I spending that kind of money on a bench I will probably never sit on (let's be honest - it's really just for looks, right?) So I told Hubs that we should just try to make one. After several discussions, we finally had a light bulb go off and realized we had an old table that we weren't using anymore and we could salvage the legs for our bench. THEN we remembered about our barn wood and decided that would make a unique top for our bench. Done and done! Let's get started. 

First, I laid out all of our barn wood, picked my favorite pieces, and got them arranged how I liked. We decided to make the bench 4.5 feet long (remember - our bed is huge) and about 18 inches wide. So, I measured the wood, made my marks and and started cutting! 

Yes, that giant saw still scares the crap out of me!!


Second we removed the legs from the old table and sanded them down to their natural state so we could paint them the color we wanted later. Since they were already used as table legs, it made assembly really simple.  


We even used the old hardware and leg supports from the table to attach the legs to the bench. Then we cut a couple smaller pieces to support the top (just in case we ever did decide to sit on it!) and for easy attachment to the barn wood. 

In this picture you can see the corner leg supports. We just paid close attention to how we took the legs off the old table and tried to replicate it when putting the legs onto our bench. It worked out well! Oh - and a Kregg Jig will come in handy for this project so you can make pocket holes and attach your supports easily. 

*Quick side note - I thought the underside of the barn wood made a neat pattern as well. I always suggest to play with everything you have. Turn it upside down, flip it over, and look at it at every angle before you make a decision. Something really simple could really change the looks of your piece.* 


Once everything was in place we gave it a quick sanding and a coat of paint. I didn't do anything fancy with this paint. All it took was a couple quick coats of the color you decide on. We used an antique grey. Oh! And that bottom piece, it was just shelving wood you can pick up at your local home improvement store. We splurged a little on that purchase (I think it was around 20 bucks)! All in all I think we ended up spending less than $30 on our bench! 


And for a little extra storage, I bought these wicker baskets at Garden Ridge. They had a HUGE selection of any shape, color, size, and style you like. It's a great place for extra tee shirt storage (if you have a ton like me) or even extra blankets and pillows. 


KC

Monday, July 14, 2014

A Vase and a Lamp Shade

As you saw in a previous post, Hubs and I made our bed (Headframes and Bedboards). Since the bed is extremely customized, we were having trouble finding the right sized....anything to go with it. 

List of things we need:
Nightstands
Lamps
End of bed bench

After some research, we decided that we should give in and buy our "nightstands." (I say "nightstands" because we need something that's at least 36 inches high....have you ever seen a night stand that tall...? Probably not! Well we started at a flea market because we'd rather redo something and give it new life than buy something manufactured. We found a small chest of drawers that would work perfectly but it needs some TLC and we didn't want to touch it until we found it's partner in crime for the other side of the bed. A few furniture stores later, we found something that will be perfect for a "nightstand." We got it ordered and it is currently being made and stained in the color we want. Whew! One item off the list...well sorta. I'll get back to the nightstand redo in another post...

In the mean time, I figured I needed to work on decorating the top of the "nightstands." Most important thing...lamps! 

We have been struggling to find bedside lamps big enough to stand next to our almost 8 foot tall bed (and I was probably being a little bit picky)...so what do we do to solve this problem? Make them, of course! All you need is a vase and a lamp shade (okay there are a few more components but that's the main ingredients). 

The vase I'm using is something simple I got at a local craft store for 50% off. You can use any vase that you like the shape of. Even if it's from a 1980's garage sale, it'll work!

*Quick Tip - If you aren't crazy about any vases you have laying around the house but are still on a tight budget and don't really want to go out and purchase one, try turning one you have upside down. This will give you a new perspective on the look of the lamp as a whole.

Once you find the vase you like, you will need to go to your local home improvement store to pick up the "guts" of your lamp. This includes the 3 way socket kit, harp, and finial.  Oh, and don't forget about your shade! If you want to use one from an old lamp that you already have, that will work just fine (you can even spruce it up with some ribbon to trim the edges)! Or, I picked this one up at a home improvement store for 15 bucks. Not too bad! 


First step in all of this is to get your vase painted, or if you already like the design on the vase, leave it as is! I wanted to do some kind of mercury glass finish but I was struggling to get the right look on my practice glass panes. So, I decided to wing it and see how it turned out. Well, when I got the first layer of my base coat on I decided I really liked the looks of it and stopped there. Not only did it look good, but it made my life a little easier. To do this, I used basic Valspar Metallic spray paint. It only took a couple coats and then I finished it off with a high gloss top coat. 

I took my own advice and decided I liked the looks of the vase better when it was turned upside down!


Once the vase was painted and dry, hubs drilled holes in the vase so we could send the wire all the way through it. He did this with a glass bit on his drill. Tape up the area you are drilling with duck tape to prevent cracking, be sure to spray your drill bit down with some water (it WILL smoke if you skip this step), and wear safety goggles. This may take a little bit of time and effort but it is worth it to be able to hide the cord in the back .


All that's left now is to put it all together! Here's the finished product. Once we get the rest of our room put together I'll be posting a better picture. 


Have a good week!

KC