Friday, June 20, 2014

Costa Rica

Happy Friday, y’all!

I get lazy on Friday’s. I get Fridayitous (or is it weekenditous?) really bad and usually find myself day dreaming about being on vacation.

A few weeks ago, Hubs and I celebrated our 1 year anniversary and took off to Costa Rica for a few days. It was FABULOUS. Everything was beyond perfect. The people there were so friendly and the country itself is gorgeous. Oh, and the food was always good! So, in honor of Friday Day Dreaming, I thought I’d share a few pictures of our trip while I pretend that I am still there!

We stayed at the wonderful Nayara Spa and Gardens just outside of LaFortuna. What an amazing hotel and what a cute little town! I was  in complete awe when we first got there.


Here is the view of our room, right at the foot of Arenal Volcano in the middle of the rainforest!


This was my favorite spot to sit. I loved watching all the colorful birds and listening to the monkeys all around us. They were sooooo loud!


Oh – and this outdoor shower was awesome. It rained every day so it was fun to go out there during storms and listen to Mother Nature all around you. Very relaxing.


The first full day we were there, we took off and went zip lining through the jungle. What a rush! Some lines were over a half a mile long, 700 feet high, and you would get up to speeds of over 60 mph. Nuts!


The day of our anniversary was perfect. After exchanging anniversary gifts, we spent some time at the spa getting a hot stone massage. Then we took off to the hot springs. These were natural springs heated by the volcano and they were HOT! Again, in the middle of the jungle so all the noises from the animals was....entertaining...to say the least!


And here are a couple pictures around town in LaFortuna. There was a gorgeous church that was framed perfectly but Arenal and this funky little bar that Hubs and I stopped at for a couple of Costa Rica’s best drinks…coffee!! (their beer is pretty good too!)


Have a good weekend! Stay safe. 

KC

Wednesday, June 18, 2014

Headframes and Bedboards

This morning while I was sitting in bed drying my hair (because that seems like the most logical place to dry my hair) I was checking out our bed. Hubs and I actually MADE our bed 1 year ago this month. Not that I don’t have confidence in my husband’s handy work but making a bed is a pretty big undertaking and I’m shocked impressed that it is still holding up! Hasn't budged at all! So since we are celebrating the one year anniversary of our bed, I thought I’d share a few pictures.

Unfortunately, I can’t really give you a step by step “how to” because I really wasn't that involved with the wood work for the headboard and frame. But I can tell you this – Hubs used a plan off of Ana White’s website (she’s fabulous by the way – definitely check out her page) and tweaked parts of it to make it our own and for it to fit a king mattress. Here's a link to the plan we used - Farmhouse Queen Bed 

I REALLY like the chevron pattern so I wanted to incorporate that into the headboard somehow….so this is what Hubs came up with:


Like I said, I can’t really give you a step by step but I do know that he cut the wood for the chevron pieces first, made a frame, and screwed all of those pieces together. Then he proceeded to do the outside of the headboard. The big posts on both ends are actually 4x4 fence posts with post caps put on top. I was really worried that it would look like we took part of a fence and added a bed frame to it (ha!) but it really turned out good! Oh, and we made everything a little bit taller than the plan called for because (1) we have a pretty deep mattress and (2) I wanted a BIG bed J

Once we got the headboard all put together, it was my job to make it look good. After some serious sanding and filling a few screw holes with wood filler, I put on a layer of wood primer and let that sit overnight. Then, the next day I used a basic black stain that you can pick up at any hardware store, and stained the entire thing. Looking back, I think I should have let this dry for a couple days, sanded again, and then put another coat of stain on it. I would really like to take a weekend and redo this stain job but I think it'd be more work than it's worth at this point. 


Now, because of the angle you have to take to get into our bedroom, we actually had to put the bed together in our room….

Hubs didn't know I was taking pictures. Oops!


And here’s the final product! (I guess I could have made the bed a little bit better). Also, I plan on getting new night stands and giant lamps to put on either side of the bed but that has yet to happen. I’ll post a new picture once we get the entire room completed!


Thursday, June 12, 2014

Wine Barrel Redo

I REALLY enjoy decorating. And over the years my husband and I have really worked together (and made some compromises) to combine our decorating senses. He has almost always had a heavier foot on the more modern side of things but I'm just not a fan. I like my space to look comfy and inviting, and as nice as the clean modern lines look, it just makes me feel like I am in some fancy hotel down town rather than my own living room.

I think we have both shifted our decorating styles and we have come up with what I call...actually I have no word for it...but I'm working on it! {Suggestions are always welcomed} So, my husband has been saying for a while that he has wanted a wine barrel somewhere in his house. We have thought of many ideas to convert a wine barrel into a decorative piece such as a high top table for the back yard, or cut it in half and make a coffee table out of it, but those things would definitely be a challenge and we were looking for more of a day project.

We found this great place in Plantersville Texas called Haggard's Country Store. The sweetest couple own the store, the land, and actually live right next door. We called them up and sure enough they had just got a HUGE shipment in of wine barrels. So we decided to head up there and pick one out!


Let me just tell you this before I go any further - if the barrel was truly used for wine making leave the bunghole (I had to look that up) corked. I could not believe the smell that was coming out of the barrel. It infused our entire SUV with a very strong wine alcohol smell. Good thing we didn't get stopped on the way home because that cop might have really questioned what we were up to.

Once home we just did some serious sanding to the entire barrel. This helped even out the grain in the wood, get rid of rough edges, and get the rust off of the metal pieces. Once sanded we just put a light walnut stain over the top and let it dry. It really turned out great. We now use it as a sitting area in our living room. All it took was a big lamp and a couple chairs to make the space usable!

Here are the before and after pics:


And here is the final product:


Now I think I need a glass of wine....

KC

Tuesday, June 10, 2014

Cupcakes and Onesies

There have been a lot of babies in my life recently. My best friend had a baby in March, another really good friend of mine became an uncle in March as well, and a co-worker/friend had a baby in May. All boys. I say that I want boys myself, but I struggle with baby shower gifts for little boys. It's hard to make the cute stuff not so cute. You know what I mean? You don't want a little boy baby shower to have all the frills and thrills that a little girls baby shower has. Right? 

Speaking of - here are a couple pictures from the baby shower I threw for my best friend. It was Circus themed, complete with a Mimosa Bar (because that makes sense, right?)


I really enjoy entertaining and the Circus baby shower was basically perfect. But, when I found out that another co-worker was having a GIRL, I was excited because I wanted to make these!


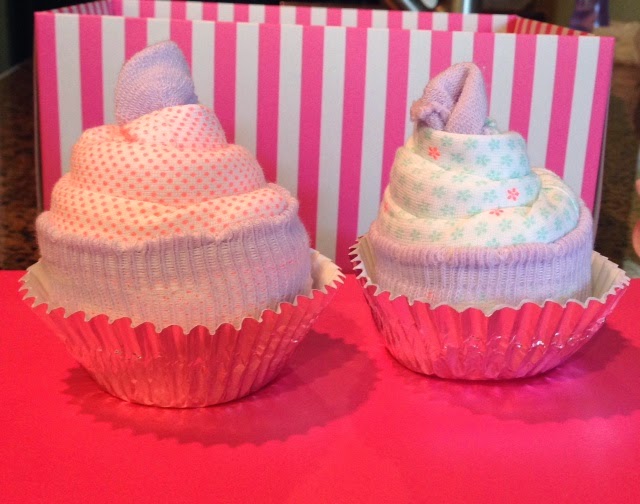
Cupcake Onesies - They are super simple!

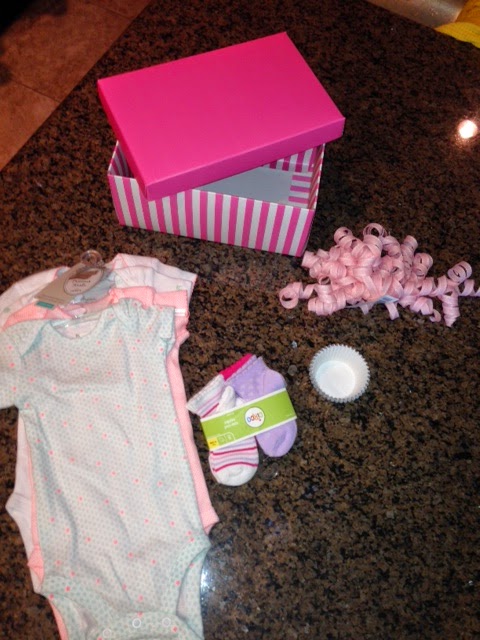
First step is to gather all of your items. For these particular cupcakes I used 3-6 month sized onesies, 6 month old sized socks, and muffin tins. You can also gather some cute ribbon and a gift box from your local party supply store to make gift wrapping easy. 


Step 2:

Start by taking one onesie and folding it into quarters.


Step 3:

Now, you are going to want the "pretty" part of your sock to show, so first turn your sock inside out. Then lay it on the onesie so the open side of the sock is on the open side (not the folded side) of the onesie. Make sense?


Step 4: 

No just start rolling! But be sure to leave enough of the sock on either side that you have enough to make your "frosting" and to hold the complete project together. I'll show you want I mean in a few... 


Step 5:

Once you have it all rolled up, you will then turn the open part of the sock up to make the bottom of the cupcake.


Once you have your completed cupcake you can put it in your muffin tin. Also, play with the top so your "frosting" looks like frosting and not like part of a sock sticking up out of a rolled up onesie ;)

*Just a little side note - I actually put some tape on the bottom of the muffin tin just to make sure your cupcake onesie stays in place*

After you get all your cupcakes made, you can arrange them in a cute little gift box!


It's a pretty simple little project and you can combine so many different colors to make it unique! Enjoy and happy....er...."baking"!

KC


Getting Started

I've been saying for a long time that I needed to start documenting my travels, my projects, even the occasional decent meal I make. So here it is. I hope you enjoy.

KC